Automate Testing with Behat
Learn how to install Behat and write simple tests.
Behat is a PHP framework for automated testing. In our blog we discuss the advantages of using Behat to continuously test your site. This guide demonstrates how to install Behat and Mink, and how to write simple tests.
Before You Begin
This guide requires:
- A local installation of Composer.
- A locally running dev site or remote site URL to point tests to.
- An empty project directory. In the commands below we assume the directory
~/projects/simple-behat-test.
As packages pulled by Composer are updated (along with their dependencies), version compatibility issues can pop up. Sometimes you may need to manually alter the version constraints on a given package within the require or require-dev section of composer.json in order to update packages. See the updating dependencies section of Composer's documentation for more information.
As a first troubleshooting step, try running composer update to bring composer.lock up to date with the latest available packages (as constrained by the version requirements in composer.json).
Install Behat and Mink
- Behat and Mink are both written in PHP, so it makes sense that they are managed with Composer. That means installing them in a project is quick and easy:
- Now that we've downloaded Behat, Mink, and a browser driver, we need to initialize Behat:
The output should read:
Configure Behat
-
Behat is configured with the file
behat.yml. If you haven't used YAML before, visit yaml.org for more information. Make the new file, and add contents below. Remember to replacehttps://your-site-url/with the actual URL to your site: -
Now, let's check out what step definitions are available to us:
This command will return a list of available step definitions. Don't worry about parsing through the list now.
Write and Run Tests
Next, we can take some of the steps we listed above, most of which are provided by Mink, and write our first test. Behat tests have the .feature extension and are located in the features directory by default.
-
Create a file named
visit-homepage.featureinside thefeaturesdirectory, with the following contents: -
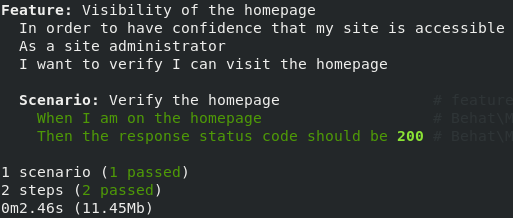
Now that we have things setup and created our first test, let's run Behat:
You should see output like this:
Note: The extra parameters are not required, just a common set of preferences. Here's what they do:
--strict: Makes Behat run in strict mode, meaning proper exit codes are thrown if tests pass/fail. This is critical for use on Continuous Integration so that jobs there will pass or fail along with the Behat tests.--colors: Ensures a colorized output, making the tests a bit more legible.--format-settings='{"paths": false}': Stops Behat from printing file paths and line numbers next to each step in the test, which can get noisy. If tests are failing, this can be re-enabled to help debug.
Next Steps
Review the available step definitions again by running ./vendor/bin/behat -dl, and create more tests by adding additional .feature files to the features directory.
If you find you are repeating the same things over and over, such as logging into WordPress or Drupal, try framework extensions. Each one adds additional steps, specific to their corresponding framework: