Configuring Visual Studio Code for Pantheon
Develop your Pantheon site locally using Visual Studio Code to edit and sync code.
This section provides information on how to develop your Pantheon site locally with Visual Studio Code.
Visual Studio Code, or VS Code, is an open-source code editor that runs on Windows, Linux, and Mac OS.
You can set up a Pantheon site in VS Code and push local changes to your Pantheon environment with Git. You can also use the VS Code SFTP extension to sync code between your Pantheon site and local machine.
Before You Begin
-
Create a site on Pantheon, or browse to the Dev environment Dashboard of an existing site.
-
Use Git, SFTP, or rsync to clone your site files on the Dev environment down to your local machine.
If you intend to upload code changes via SFTP, place your site code in a subdirectory called code (for example, ~/sites/mysite/code). This aligns with the file structure on the platform when using SFTP mode.
- Download and install VS Code.
Create a VS Code Workspace
A Workspace in VS Code contains settings for your project, including recommended extensions, configuration for extensions, and project-specific debugging configuration.
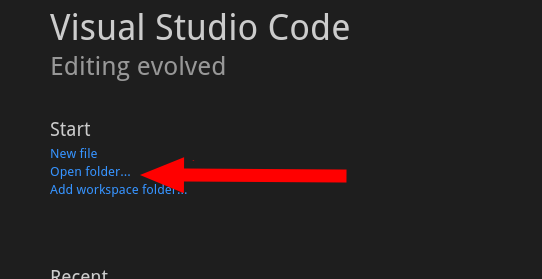
- Navigate to the VS Code Welcome screen, click Open folder... under the Start heading:
If you have already closed the Welcome screen, click Open... in the File menu.
-
Navigate to your filesystem and select the directory containing your site (for example,
~/sites/mysite). -
Save this as a Workspace by selecting Save Workspace As... from the File menu.
Workspace settings are stored in a file called
.code-workspaceat the root of your project. We recommend that you keep this file out of Git by adding it to your.gitignorefile at either the site or global level:
- Click a file name in the File Explorer on the left side of VS Code to open it and make edits in the main window.
Deploy Local Code Changes to a Pantheon Environment
You must push code changes up to your Pantheon Dev or Multidev environment. You can do this with Git or SFTP.
Push Changes with Git (Recommended)
VS Code includes Git integration and an integrated terminal, either of which can be used to make Git changes and push them back to your Pantheon repository and Dev environment.
-
Make sure your site is in Git mode before pushing code via Git.
-
Make changes to your local site.
-
Push your changes:
Git Version Control in VS Code
-
Open the Git menu and press Ctrl + Shift + G or click View and select SCM.
-
Review your outstanding changes before you commit them with a message.
You can also switch branches. Refer to the VS Code docs for more information.
Integrated Terminal
-
Open the integrated terminal with Ctrl + ` or click View and select Terminal.
-
Interact with Git as you would normally, without leaving VS Code.
Upload Local Changes with SFTP
Refer to the Upload your Changes with SFTP section of the SFTP guide for steps on how to upload local changes with the VS Code SFTP extension.
CMS-specific Extensions
VS Code's basic functionality can be extended by adding third-party extensions, and a number of these exist for Drupal, WordPress, and PHP. Refer to the sites below for useful CMS-specific extensions.
- Drupal: Drupal.org - Configuring Visual Studio Code
- WordPress: Delicious Brains - Using VS Code for WordPress Development
